Clean your plate
Labels:
Daily Find


I love it when people think outside the box and turn a normal, boring, common daily use article into something interesting and cool, to somehow make simple things like: taking a shower more fun.
I saw this and i knew i had to share, they are so cute and well made you'll swear they are the real deal.
You can buy these great vegan soaps right here!
How to make a Tutu
Labels:
Tutorials
- Tulle: About 6 yards of favorite color.
- Elastic Band: depending of measurement
- Ruler or tape measure
- Scissors
- Embellishments (flowers, ribbons, pompoms, etc)
Either way is still going to be sweet and beautiful once is done, specially after you see it wasn't that hard to do and realize how much money you saved instead of buying it on a store or online.
Good luck to all of you who follow the tutorial, I hope you like it and find it easy to do. Remember to post pictures so i can see your creations :)

It came with the house!
Labels:
Food
Everyone that knows me knows that I am not a big fan of the kitchen, let's face it, the only reason i have one is because it came with the house. =P
So, for obvious reason I have to come out with tasty yet simple recipes to make my trip to that area of my house as fast as possible.
One of my all time favorites is without a doubt: Sweet potato fries.
They're not only yummy but so easy to do and it only takes me 15-20 minutes to get them done.
If you haven't try them yet....you are up for a big treat, they're healthy and oh so yummy!
Here is how i make them:
Since we are only 3, I use 2 big sweet potatoes, i peel them, and wash them, then i proceed to cut them in little stripes and place them on a baking sheet...sprinkle some olive oil, salt and black pepper, tossed them a little and into the oven for 10 min in 400F. I then get them out, flip them and in the oven again for another 10min. I like them crispy so i cut them a little thinner and sometimes leave them in for 5 extra min. I hope you like them!

"Square Minded"
Labels:
My Projects
My daughter Gianna is crazy about Spongebob, and to be honest i grew to like him as well, she had been asking me to throw her an Spongebob party ever since we were at Publix ordering the Blues Clues cake for her 3rd birthday. She eats, breaths and talks Spongebob all day, so i decided to throw her a Bikini Botom Luau. We live in Florida, so that seem like a great idea, the problem is that for some reason the crazy weather decided that it was cold enough up north and started spreading down here in our sunshine state, as a result we got really chilly days. Luckily the day of the party was just great, perfect temperature and no humid at all. The party was a hit and everyone loved the details.
Gianna also wanted to dress like Spongebob (of course) and I wanted to please her but i just didn't wanted her to look like a boy, so I came out with an idea for an outfit and even made an adorable yellow tutu, because... what is more girly than a girl on a cute little tutu? right? I also made her a krusty krab hat and name tag to complete the outfit. I am very please with the way it came out. what do you think?
Here are some samples of what i did for the party:

I spelled "Welcome" with sticky letters and placed it at the entry door

This is a lollipop holder, sadly i don't have an after picture but I added Patrick next to Spongebob and cut the stick on the lollipops so the decoration would show.

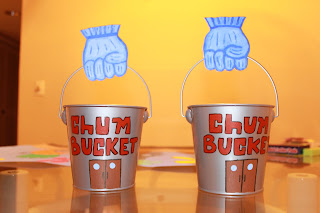
I found this tins at the dollar tree, i simply painted the "Chum Bucket" on the front the painted hand was made out of cardboard.


This menu was pretty easy to do, i got a simply cardboard sheet and glued a long white sheet of paper from my daughter's easel, i created a photoshop document with the menu items with Spongebob font, printed it and glued it to the board, i then added blue and red ribbons on the border to give it more charachter and also drew sea related items with markers.


 The centerpiece is also very easy to do but i will post a tutorial about it later ;)
Instead of playing the usual "Pin the tail on the dunky" i opted for a much more fun version..."Pin the dollar in Mr.Krabs" I painted the Mr.Krabs and made a simply Bikini Botom bill with green paper which i covered with wide clear tape just so i can put double sided sticky tape behind.

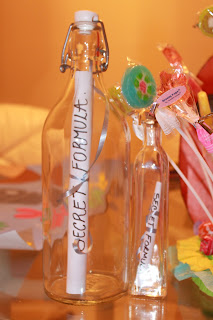
For this i created a photoshop document which i then print and paste on the bubbles bottles. Easy!

 pink an yellow gift bags
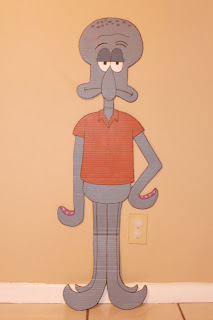
 Yes i made all of them, all of them out of cardboard and hand painted...the idea was to put them in the front yard so i glued wooden stick on the back for support, but once the guest started parking and we ran out of space i decided it was better to keep them next to the pool.
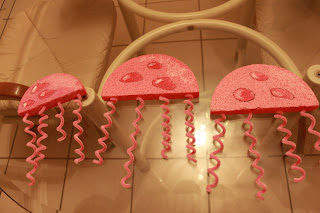
 The Jellyfishes were a hit...and guess what they also are veeeery easy to do, buy Styrofoam circles and cut them in half, paint them pink and add a darker pink shade circles for design, then i made the strings with pink pipe cleaners..
 Inside of the yellow pail i had tons of Rainbow Goldfish crackers :)
Subscribe to:
Posts (Atom)


